Hi guys and welcome back to this project which I hope you will agree, is really going to take shape, quite literally this week. We finished up the last post, with all the wood pieces cut and ready for assembly to begin.
If you missed this previous post, the please take five minutes to read through ROBOTRON CABARET SCRATCH BUILD – PART 2. then come straight back here, it’s going to be good…
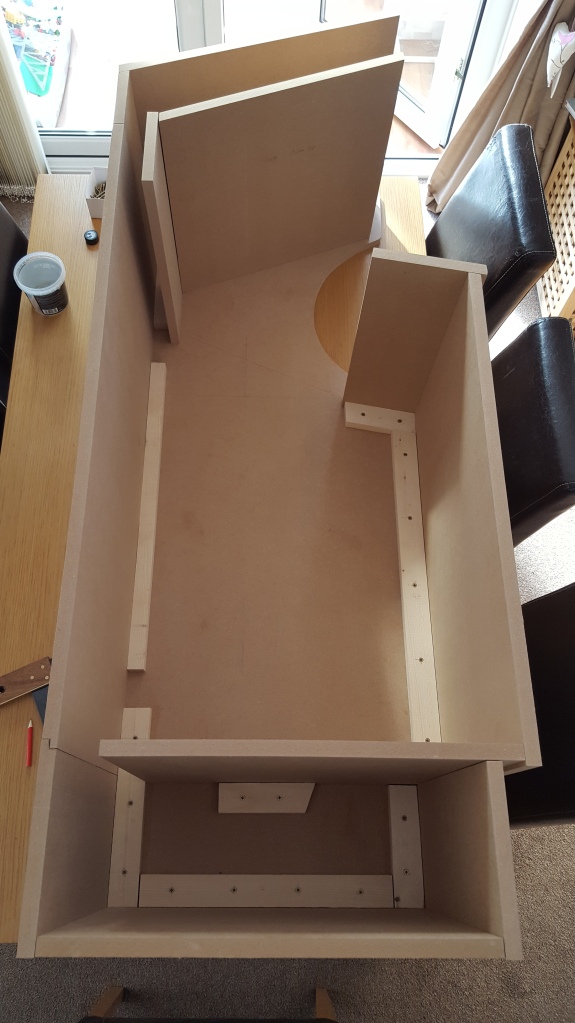
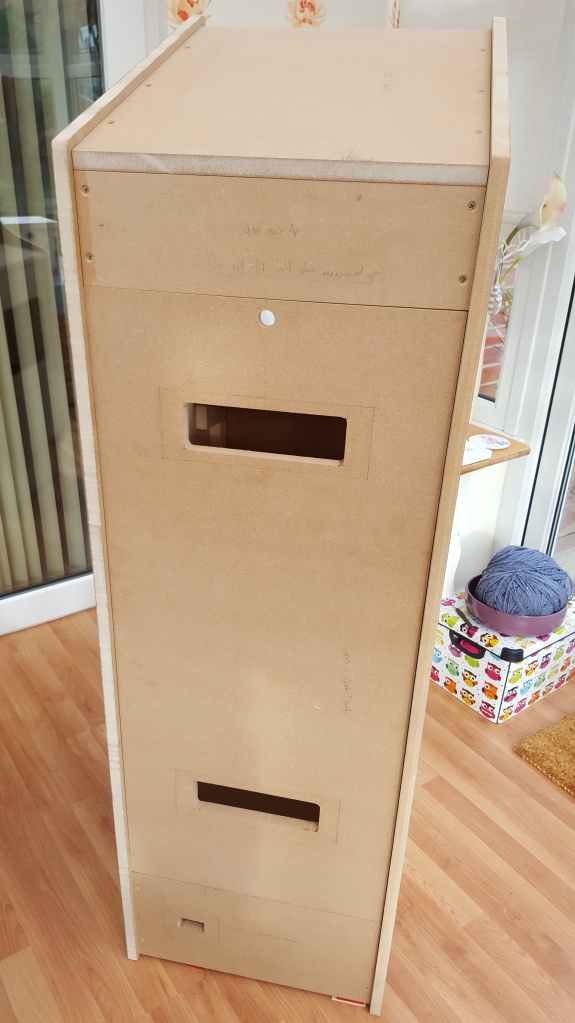
Okay, with the panels all cut, the next important thing to do is to dry fit the majority of the pieces. This brings a number of benefits to the build; it allows me to check that the pieces actually fit they way they do in my head and on my plans; they let me visualise how the cab will go together, which is sometimes difficult for me, no matter how may plans I make; it also highlights which edges will be visible when constructed – I mentioned earlier that I always try to conceal as many edges as possible, which is evident on the photo below, with most of the pieces fitted.
Once I am happy with this, there are a few recesses that need to be cut out of various panels, prior to fitting, to house parts once built, such as; vents, coin door, cam locks, speaker and power outlet. First up is to order these parts, so off to Ebay and a few clicks later the parts on their way. The air vents are £1.60 each; Cam Lock £1.29; Power Switch £0.99; Speaker £4.50, all from Ebay. The coin door was collected from a forum friend and fellow Robotron player for £25 – a great price for a fully restored, powder-coated door. Thanks again Russ.
With all the parts arrived, I transfer the dimensions of the cut-outs onto the relevant panels. For the easier, simple, holes, such as the cam lock and vent rectangles, I just rout these straight out of the panels, using guides where needed. For the speaker grille, this is done on the router table, using a simple jig to move the panel a measured distance after each groove. I really like using jigs in woodwork, as once they are constructed, thy can be used again and again, from one project to another, always giving the same accurate results.
For the coin door, I made a jig, which was tailored to fit this exact door and take in the nuances of the door itself. It took a few goes on scrap wood to get the fit I wanted, but better wasting scrap wood than the actual front panel. Once I had this jig made, I centered it onto the panel, secured it with clamps and using a flush cutting bit in my router, guided it around the jig to accurately replicate the cut out into the front panel.
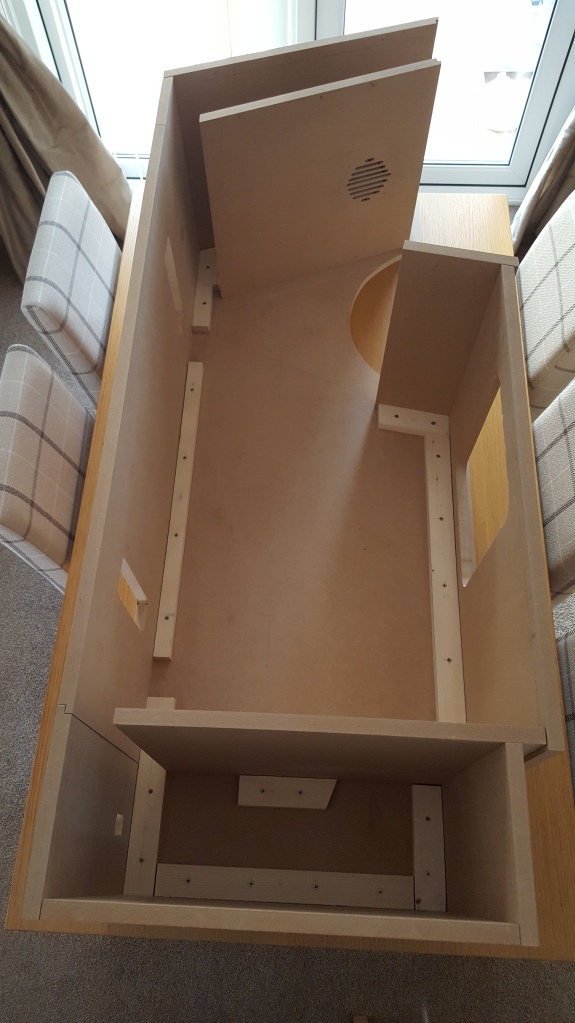
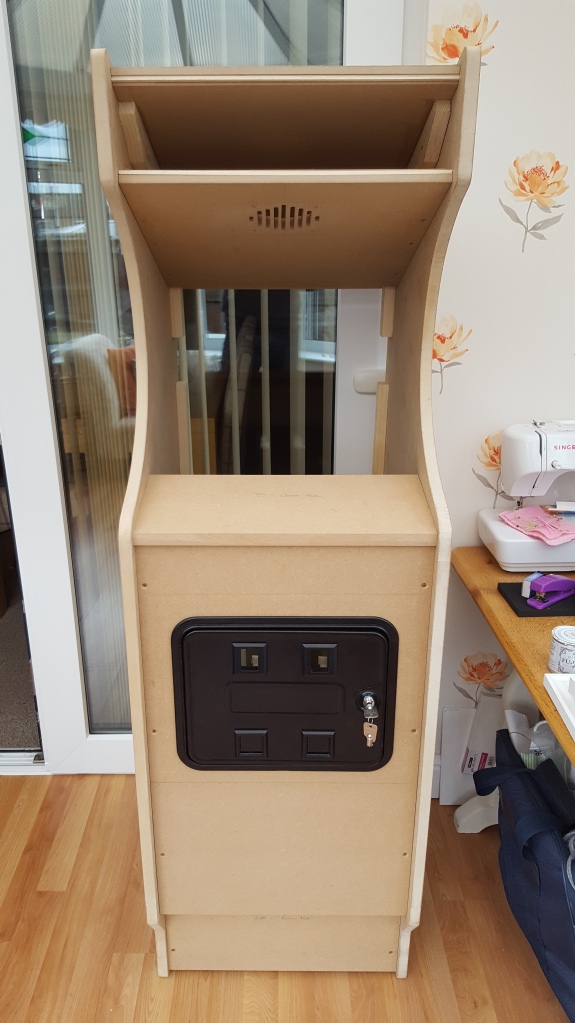
Above is a very similar photo with the pieces once again offered up, but this time the recess are cut out and visible. (The more astute amongst you, will notice the change of dining chairs – which is indicative of how little time I sometimes get to put into these projects and the build can take longer and longer with periods inactivity commonplace.)
Whilst the cab is in this state, it is a good time to mark out positions on all the panels for where the screw fixings will go, to ensure that they do not fowl any of the screws already in the batons. Then these positions are all pilot drilled through the panel into the baton and the panels then countersunk, deep enough to allow for the screw head to be filled and hidden by wood filler. After this it is just a case of ‘gluing and screwing’ each panel to their respective batons, adding the second side panel and repeatedly the whole process.
This is possibly the most visually striking progression of the whole build, transforming what was merely a pile of flat pieces of wood into and actual structure that is instantly recognisable as an arcade cabinet;
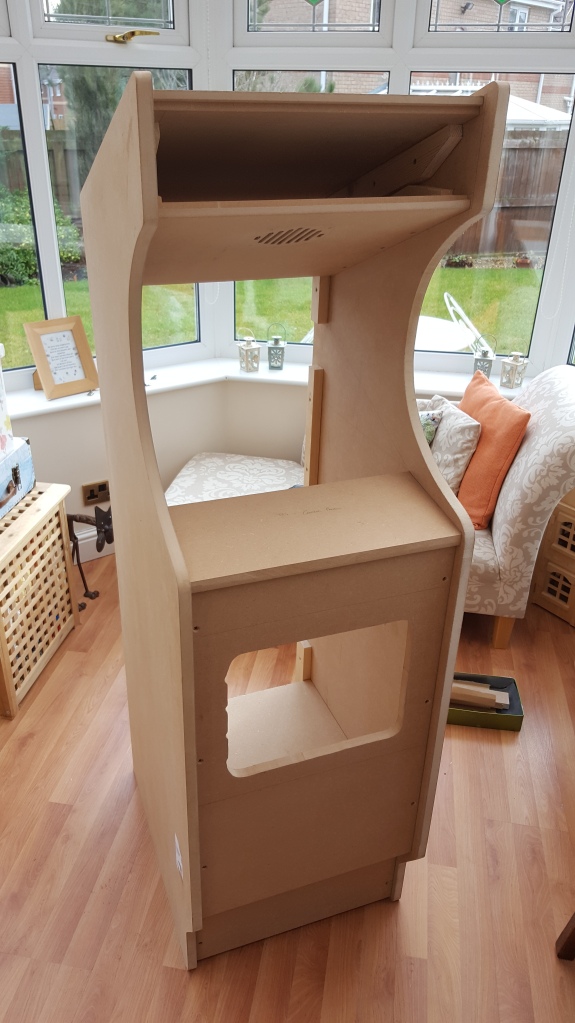
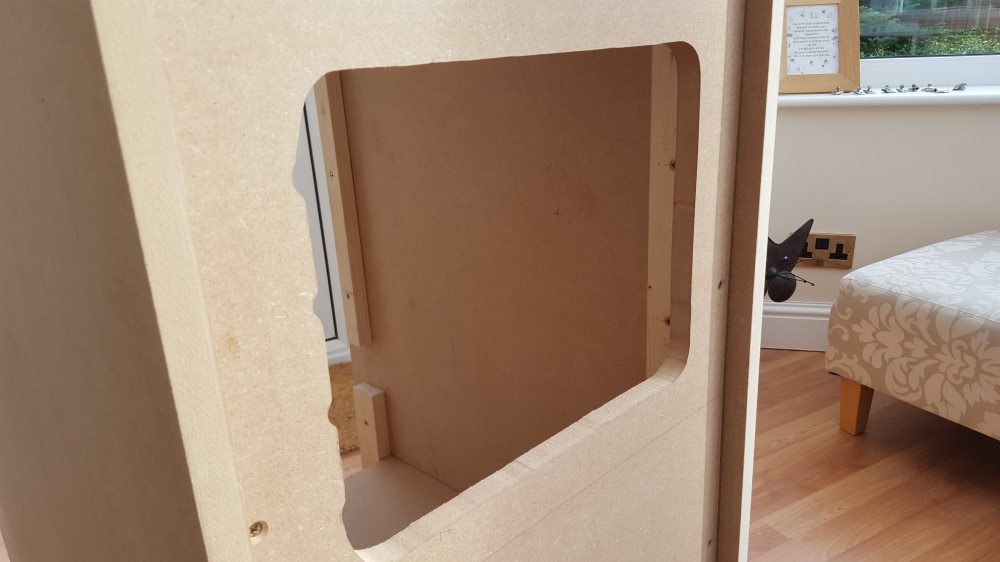
You can really get a sense of how this is going to look when finished, even without a populated control panel, empty cut-outs and no back, I get a real kick at this point in the build and that kick translates into a definitive spur of motivation to keep momentum up. A close up shot of the coin door recess, shows the nuances I wanted to accurately cut to ensure the snuggest of fits of the coin door.
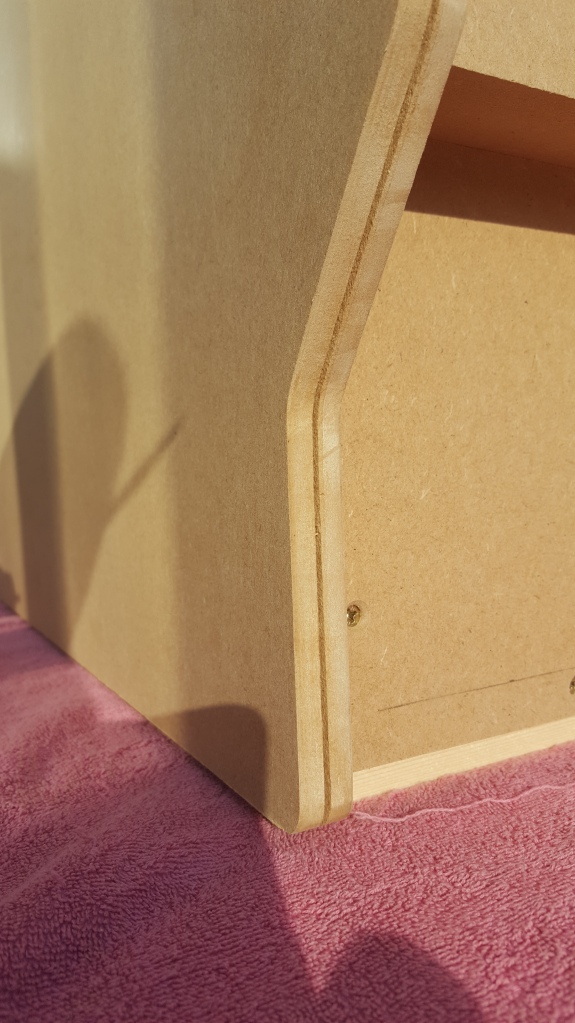
The next photo shows the cabinet from the rear where you can see the four recesses ready to receive the vents, lock and power switch. It also shows the only edge that will be visible (if you go snooping around the back of the cab), I have sanded this to 1200grit and at this level the MDF turns into a highly polished, non-permeable finish, which will hold paint and have a finish the same as the panels.
The next photo is simply because I can, and is a nice front shot with the coin door, snuggly sitting in situ;
During most projects I tend to keep a running checklist of jobs still to do, and one such job was to cut the grooves into the edges of the side panels to receive the T-molding later on. For this job I decided early on it would be easier to use a handheld router than try to manoeuvre the large side panel around on the bed of the table router, and then easier to use the handheld when the cab is constructed to this point as it is a lot more stable and acts as it’s own workbench, holding the panel off the ground and keeping it nice and steady. With my router equipped with a suitable slot cutting bit, I put the cab onto it’s side and run the router around both side panels. This is a job best done outside as the dust levels it creates are mammoth. As with most woodwork, the old adage of measure twice cut once rings true. I test this out on various pieces of scrap to ensure I have the depth of the cutter exactly right. Don’t want to mess up at this point, but nice and steady, sees the groove cut in the exact centre all around.
Whilst all of this has been going on, I have been making decisions on both what I am going to populate the control panel with and how I am going to actually fabricate the panel.
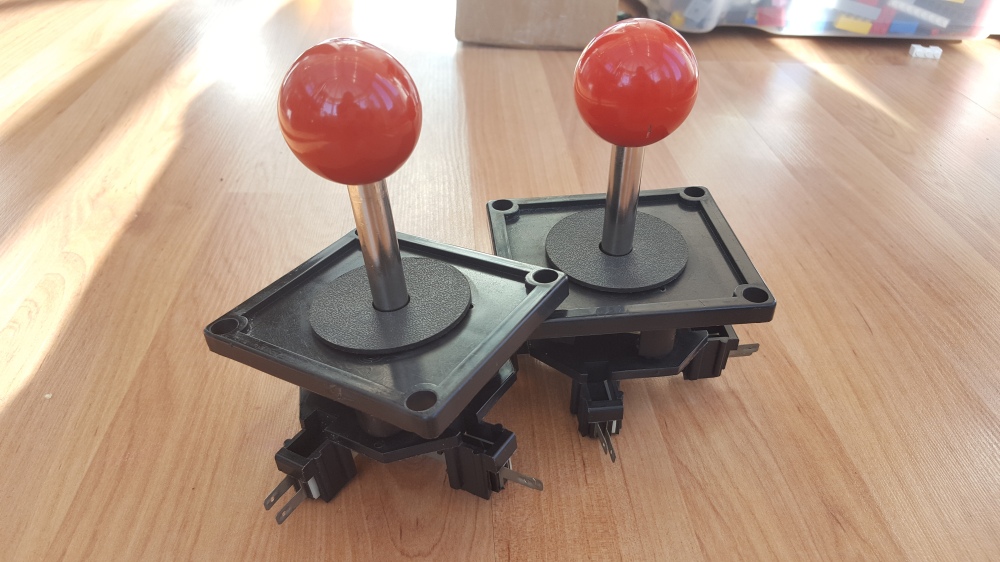
The original William’s cabinets were all factory fitted with Wico joysticks (with the exception of some Euro full size upright cabinets, which were fitted with other sticks.) The Wicos are eight way, leaf switched with a 4″ (although they also make a 3.5″) stainless steel shaft. The grommet and spring combination inside the stick make for a very smooth transition whilst rotating the stick around the axis’, which is not only essential but also part of the experience, when playing this game. For instance when I play it on my candy cab using the 1&2 player sticks, even though they are good Seimitsu LS-32 sticks, they just do not feel right when playing the game. Then, whilst online, I found another company in the States, making similar leaf switch sticks to the Wicos, but there were no real reviews or comparisons and they were not cheap either, with shipping.
So, I decided that, for all these reasons, and also because, although this is just a repro build, I want it to be as close to the original as possible in the places that matter, and as the sticks are what connects you to the game, I felt that I needed to ensure I did the build justice, so the hunt was on to find myself a pair of Wico sticks…… Now there probably are some new old stock (NOS) Wicos lurking around out there in the wild, or in the prized stash of a collector, but, after some asking around, I was pointed to a guy in the States, who was advertising ‘refurbished Wico sticks’, all original parts, nicely refurbed to a good standard, he had a load of praise from previous purchasers and had a nice pair of 4″ red ball tops, just about ready to ship.
Good enough for me. We worked out a deal and I think the £80 (inc shipping) that I paid was very well spent.
The control panel also has two translucent blue leaf switch buttons in the centre at the top, to select between a 1 player or 2 player game. I knew exactly what they looked like, but not what they were called. Initial searches for ‘Robotron Buttons’ failed to find what I wanted, until I started to look towards William’s other line of machines, pinballs. With Williams producing a good number of pinball tables at around the same time Robotron was released it must’ve made sense to use the same parts across both ranges. Once I had worked this out, the buttons were there in abundance and for only £4 including fixing nuts, remarkably cheap.
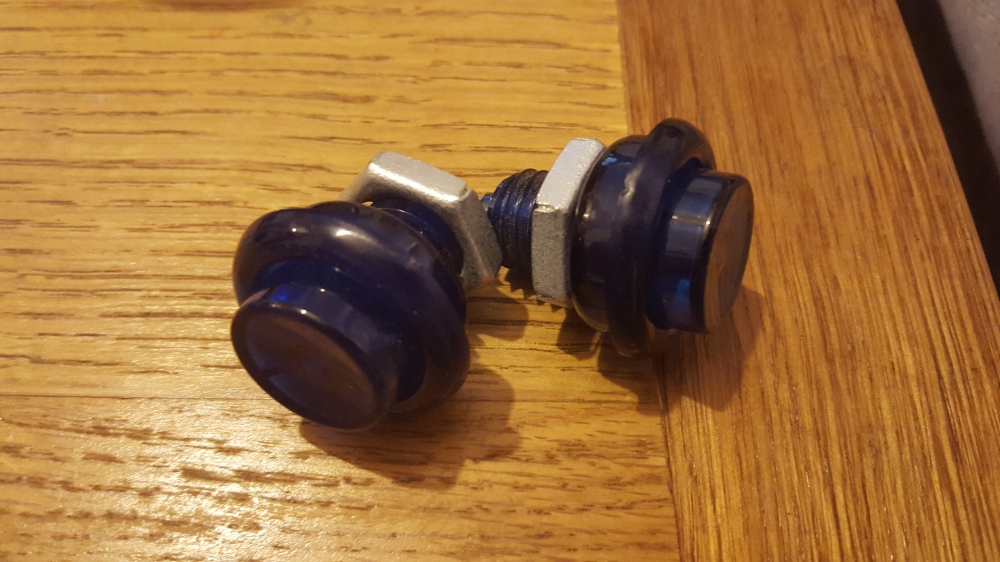
These didn’t come with the leaf switches, but another forum member came rushing to my aid, and posted me a couple of these, in return for ‘absolutely nothing’. Very kind indeed and yet another example of the great camaraderie and community that surrounds this, at times, crazy hobby. Thanks again Vic.
Meanwhile I got in touch with yet another forum member who I (and pretty much everyone else I know), always use for any artwork needs. He is known as MuddyMusic across most forums (real name Olly) and has his own online art store the Arcade Art Shop. Olly has and continues to provide an excellent service for anyone restoring or reproducing anything arcade related and is building up an excellent library of images, including some amazing, vectoring, scanned artwork from original cabinets. I told Olly what I was up to, what I needed, gave him the measurements and left the rest to him, to come up with some drafts of what I was after. Sometimes this can take time to get exactly how I want it, so always best to start these slower balls rolling in the background.
Another job that was rumbling away, was the monitor I had collected from James, as a non-worker. I had dropped that off around the corner from where I live, at a brilliant old school television repair shop, where I genuinely think they relish a chance to look at the old stuff, instead of being drowned by knackered plasma screen or blown hairdryers. They narrowed one fault down to a faulty tripler and set about replacing that at a cost of £10. Would it fix it, only time would tell……
And that ends this week’s update, some definite progress I hope you would agree. Next up I will be manufacturing the control panel, something which took quite a lot of thinking and a few trial runs to get it exactly how I wanted it. The challenges being a mix of having very limited space on a cabaret sized cabinet to fit the substantial Wico sticks, coupled with the build having to be robust enough to withstand the most frenzied gameplay that Robotron commands in absolute bucket loads. A
s well as also managing all of this without having any visible fixings on the top, but yet still allowing for access/repair/replacement of parts should the need ever arise.
And if I manage to get that sorted it will time to prep the cab for prime and paint. Now I wonder how that monitor is going………….
See you all next time I hope.
If anyone has any thoughts on this build, the debate between original (but scarce) versus reproduction, the game itself, or anything else relevant, please leave a comment as it would be great to hear from you.
Thanks all.

Great work Neil, love these updates, would read them everyday. In relation to reproduction parts, i am like you in that respect, do your best to get it closest to the real thing, if you can’t get a Wico then get as close as you can.
Onwards and upwards,
Ed
LikeLiked by 1 person
Thanks pal. The price of genuine Robo cabs is, like everything retro, skyrocketing, even on the forum friendly sales. This is realistically my only option. As for the wicos, worth every penny. You’ll definitely like the next update.
LikeLike
Great work Neil! Glad you were able to secure some proper joysticks, this will make it feel like a Robotron as much as the look of the cabinet. Looking forward to the next post.
Roiy
LikeLiked by 1 person
Thanks pal. I had to do the build justice. I know some will say that original parts should be kept for original cabs, but, these are so integral to the game/experience I had to source some. Everything else repro though. Promise.
LikeLike
With regards to the debate about original v repro, I totally see a place for repro builds. You’re keeping the spirit of the original game alive and as long as you don’t try to pass it off as an original then I think there’s no problem with it. If it was a very common cab then perhaps the effort should be made to hunt out and look after an original machine, but if it’s a cab that is rare or very hard to get hold of then doing a repro makes perfect sense, so you can enjoy the ‘spirit’ of the game. In a way it’s kind of not too different from authentic 25th anniversary cabs perhaps? My MAME build is just generic and I’m sure some people don’t like them. But at least you’re doing a build with total respect for the original game and trying to be as authentic as you possibly can. Fair play.
LikeLiked by 1 person
Thanks for this. I totally agree with everything here. I love the hunt for the original stuff, cabs and consoles, buy I enjoy playing more.
LikeLike